Monday, December 27, 2010

Prime Rib, Kitchen Update and Christmas Snow


Christmas had a couple of surprises for us:

First we had a white Christmas, even though the show didn't show up until late in the evening on Christmas day. We got 4 tenths of an inch. It snowed all Christmas night and we ended up with 6 inches, Considering North Carolina only gets between 6 and 7 inches annually this is considered a major storm.

Second the kitchen remodel is almost complete. I got to make our Christmas dinner in the new kitchen. We need one more box of flooring and a few drawer pulls for the job to be complete. If it wasn't for Christmas and the snow the kitchen would already be complete. Click here for a sneak preview.

While I was able to get in the kitchen and make an occasional meal I wasn't able to do any real cooking. So my Christmas dinner was the first real meal I made in the new kitchen. I decided to make prime rib, hassleback potatoes and asparagus. The prime rib recipe was based on a Tyler Florence recipe I found on the Food Network website.

Prime Rib With Horseradish Crust

1 bone in prime rib beef roast, 3 ribs, about 6 pounds
5 garlic cloves, smashed
1/4 cup grated fresh or prepared horseradish
Leaves from 2 fresh rosemary sprigs
Leaves from 4 fresh thyme sprigs
1/2 cup kosher salt
1/4 cup freshly ground black pepper
1/2 cup extra-virgin olive oil
1/2 cup dry white wine
1 tablespoon all-purpose flour
2 cups canned chicken or beef broth

I made a couple of changes to this. I only used a 1/4 cup of salt and it made a good paste (described below) and I still thought that some bites seemed very salty. I started with 1 tbs of flour and the gravy was very soupy so I added one additional tbs and ended up with a thin gravy. This was ok as the leftover gravy can now be used for aus jus. The recipe took every bit of the 2 hours, if it wasn't for my children wanting to leave to get home before the snow, I would have cooked it a little longer. It was still very good and the gravy was excellent.

Here are Tyler's instructions with my comments in brackets [ ].

Preheat the oven to 350 degrees F.

Lay the beef in a large roasting pan with the bone side down. (The ribs act as a natural roasting rack.) In a small bowl mash together the garlic, horseradish, rosemary, thyme, salt, pepper, and olive oil to make a paste [I used a mortar and pestle to get everything finely mashed]. Massage the paste generously over the entire roast [I had enough paste to cover top and sides but not the under side where the bones are]. Put the pan in the oven and roast the beef until the internal temperature of the meat registers 125 degrees F on an instant-read thermometer (medium-rare), 1 1/2 to 2 hours [See my comment above]. Remove the beef to a carving board and let it rest for 20 minutes before carving.

Pour off some of the pan drippings and place pan on stovetop over medium-high heat. [I saved 1 tbs of drippings to go with the original 1 tbs of flour. I wished I would have saved more since I ended up adding more flour to thicken it. I would save 2 to 3 tbs if you want thicker gravy.]

Add the white wine and bring to a simmer, scraping the bits on the bottom of the pan. Reduce the wine by half. Whisk in the flour, then add the broth and continue to cook, whisking until sauce thickens into a gravy, about 10 minutes. [I would use low sodium broth if use Tyler's 1/2 cup of salt. It took longer than 10 minutes to get thicker gravy, but I had to go back and add additional flour to thicken it.]

My wife, Annette, took this picture of the pond behind my house.

Tuesday, December 14, 2010

Remodel Days 4 & 5

Day 4
The kitchen started to look like a kitchen again, but a really messy one. Today they installed the new cabinets, the pantry and the desk. The new cabinets are the exact same ones they installed when the house was built. After 10 years the old cabinets have aged and the color is a little darker, you can see this in the picture of the pantry. They also did some of the electrical work.


Day 5
Today was one of those days where you can't see where much was done. The cabinets installation was finished. They added the shelving, leveled the cabinets and made sure they shut right. The guys who install the countertops came and made templates of the cabinets. They do this so they can cut the granite to the right size. The electrician moved and installed a couple more outlets and some light switches.


Tomorrow we should see a big change, but I am going to make you wait to see what it is in case they don't stay on plan.

Saturday, December 11, 2010

No Christmas Cookies This Year

Twas 17 days before Christmas and all through the house
Not a chef was stirring not even the mousse
The plastic was hung by the island and chairs
In hopes that the new kitchen would soon be there

At the beginning of the year my wife and I decided to replace the flooring and countertops in our kitchen. They were both original to the house and needed replacing. This of course got us talking about what we could do to improve the design of our kitchen to improve it. After talking to 6 or 7 seven contractors over the course of the year, we found one that we really liked. The new floors and countertops now include doubling the size of our island, adding a pantry and cupboards, a new backsplash and adding a desk. We also replaced our old appliances, they were installed before the remodel so the br=efore pictures show the old but the during show the new ones. We are three working days into the project. The contractor says we will be done before Christmas.

Here are before pictures.


Day 1
The existing island was ripped out, the old flooring removed and they began removing the backsplash. The backsplash became and issue as it wouldn't come down without taking chunks of the sheetrock with it.


Day 2
The backsplash was removed and new sheetrock was installed where the backsplash used to be. Then the counters were ripped out, except where the sink was. No electricity except to the appliances.


Day 3
The new cabinets were supposed to be installed, but not all of them were sent. So the painter came and primed the walls and the plumber came to fit the sink. The sink we ordered was discontinued so they sent a larger one, the plumber had to make sure that it would fit before we installed the countertops. No more water in the kitchen until we get countertops and a sink.

Sunday, November 28, 2010

Turkey Shepherds Pie with Sweet Potato Topping


I have a rule that at Thanksgiving you should only eat until the button on your pants pops off and hits the chandelier or as my son says "eat until it hurts". I am not sure why we bought a 20 pound turkey for 7 people, but we wouldn't have all of these leftovers if we didn't. This recipe was based on EatingWell's Turkey & Leek Shepherd's Pie and turned out to be very tasty.

Turkey Shepherds Pie with Sweet Potato Topping

Filling
2 teaspoons extra-virgin olive oil
2 cups thinly sliced carrots
3 cloves garlic, minced
1/3 cup dry white wine
3 tablespoons all-purpose flour
1/2 teaspoon dried sage, rubbed
2 cups reduced-sodium chicken broth
2 cups diced cooked turkey
3/4 cup frozen peas
salt and freshly ground pepper to taste

Mashed Sweet Potatoes
2 pounds sweet potatoes, peeled and cut into chunks
1/2-3/4 cup milk
salt and freshly ground pepper to taste
1 large egg, lightly beaten
1 tablespoon extra-virgin olive oil

1. To prepare filling: Preheat oven to 425°F. Heat 2 teaspoons oil in a large skillet or Dutch oven over medium heat. Add carrots and cook, stirring, about 7 minutes. Add garlic and cook, stirring, 1 minute more.

2. Pour in wine and stir until most of the liquid has evaporated. Add flour and sage and cook, stirring constantly, until the flour starts to turn light brown, about 2 minutes. Stir in broth and bring to a simmer, stirring constantly, until the sauce thickens and the carrots are barely tender, about 5 minutes.

3. Add turkey (or chicken) and peas and season to taste with salt and pepper. Transfer the mixture to a deep 10-inch pie pan or other 2-quart baking dish and set aside.

4. To mash potatoes and bake pie: Place potatoes in a large saucepan and add cold salted water to cover. Bring to a boil over medium heat. Cook, partially covered, until the potatoes are tender, about 10 minutes. Drain and return the potatoes to the pan. Cover and shake the pan over low heat to dry the potatoes slightly, about 1 minute. Remove from the heat.

5. Mash the potatoes adding enough milk to make a smooth puree. Season with salt and pepper. Stir in egg and 1 tablespoon oil.

6. Spread the potatoes on top of the turkey mixture. With the back of a spoon, make decorative swirls. Set the dish on a baking sheet and bake until the potatoes and filling are heated through and the top is golden brown, 25 to 30 minutes.

Wednesday, October 27, 2010

Chocolate-Raspberry Torte


Many of you know that I test recipes and shop for groceries for Cook's Illustrated. This is a recipe that I tested several months ago, at that time I published a photo on the FoodBuzz website. Well Cooks Illustrated finally published the recipe in the November 2010 issue. This means I can publish the recipe now. This recipe is the first recipe I have tested where some big changes were made before the recipe was published. They added more chocolate, almost doubled the amount of almonds and the amount of vanilla was doubled. Since the first one was delicious I can only imagine how good it is with more nuts, vanilla and chocolate. The glaze turned out so shiny you can see the reflection of the raspberries in it. You can check out the entire recipe and notes in the November/December issue of Cook's Illustrated or on their website.

Chocolate-Raspberry Torte
Cake and Filling
8 ounces bittersweet chocolate , chopped fine (see note)
12 tablespoons (1 1/2 sticks) unsalted butter , cut into 1/2-inch pieces
2 teaspoons vanilla extract
1/4 teaspoon instant espresso powder
1 3/4 cups (about 7 ounces) sliced almonds , lightly toasted
1/4 cup unbleached all-purpose flour (1 1/4 ounces)
1/2 teaspoon table salt
5 large eggs
3/4 cup (5 1/4 ounces) sugar
1/2 cup fresh raspberries , plus 16 individual berries for garnishing cake
1/4 cup seedless raspberry jam
Chocolate Ganache Glaze
5 ounces bittersweet chocolate , chopped fine (see note)
1/2 cup plus 1 tablespoon heavy cream

INSTRUCTIONS
1. FOR THE CAKE: Adjust oven rack to middle position and heat oven to 325 degrees. Line bottom of two 9-inch-wide by 2-inch-high round cake pans with parchment paper. Melt chocolate and butter in large heatproof bowl set over saucepan filled with 1 inch simmering water, stirring occasionally until smooth. Remove from heat and cool to room temperature, about 30 minutes. Stir in vanilla and espresso powder.

2. Process 3/4 cup almonds in food processor until coarsely chopped, six to eight 1-second pulses; set aside to garnish cake. Process remaining cup almonds until very finely ground, about 45 seconds. Add flour and salt and continue to process until combined, about 15 seconds. Transfer almond-flour mixture to medium bowl. Process eggs in now-empty food processor until lightened in color and almost doubled in volume, about 3 minutes. With processor running, slowly add sugar until thoroughly combined, about 15 seconds. Using whisk, gently fold egg mixture into chocolate mixture until some streaks of egg remain. Sprinkle half almond-flour mixture over chocolate-egg mixture and gently whisk until just combined. Sprinkle in remaining almond-flour mixture and gently whisk until just combined.

3. Divide batter between cake pans and smooth with rubber spatula. Bake until center is firm and toothpick inserted into center comes out with few moist crumbs attached, 14 to 16 minutes. Transfer cakes to wire rack and cool completely in pan, about 30 minutes. Run paring knife around sides of cakes to loosen. Invert cakes onto cardboard rounds cut same size as diameter of cake and remove parchment paper. Using wire rack, reinvert 1 cake so top side faces up; slide back onto cardboard round.

4. TO ASSEMBLE TORTE: Place ½ cup raspberries in medium bowl and coarsely mash with fork. Stir in raspberry jam until just combined. Spread raspberry mixture onto cake layer that is top side up. Top with second cake layer, leaving it bottom side up. Transfer assembled cake, still on cardboard round, to wire rack set in rimmed baking sheet.

5. FOR THE GLAZE: Melt chocolate and cream in medium heatproof bowl set over saucepan filled with 1 inch simmering water, stirring occasionally until smooth. Remove from heat and gently whisk until very smooth. Pour glaze onto center of assembled cake. Use offset spatula to spread glaze evenly over top of cake, letting it flow down sides. Spread glaze along sides of cake to coat evenly.

6. Using fine-mesh strainer, sift reserved almonds to remove any fine bits. Holding bottom of cake on cardboard round with 1 hand, gently press sifted almonds onto cake sides with other hand. Arrange raspberries around circumference. Refrigerate cake, still on rack, until glaze is set, at least 1 hour and up to 24 hours. Transfer cake to serving platter, slice, and serve.

Saturday, October 23, 2010

Easy Cassoulet


One of my favorite cookbook authors is Pam Anderson, no not that Pam Anderson, this one is married to a minister. The reason why I like her is that in most of her books she just doesn't give recipes, she gives formulas. So a recipe for a stir fry maybe use 1/2 pound of protein, 1 pound vegetables, etc. Then she will give a list of suggested proteins and vegetables. Then she will give you a list of sauces you can use for stir fries. Finally she will finish with some recipes for her favorite stir fries. I usually recommend her books to people who are just getting into cooking, you will learn how to cook not recipes like you do from Betty Crocker or some of the other beginning cookbooks. Pam just came out with a new book, Perfect One-Dish Dinners, so I had to try a recipe. As usual it was delicious. I am looking forward to trying some more of her recipes from Perfect One-Dish Dinners.

Cassoulet-Style Italian Sausages and White Beans

2 1/2 punds sweet Italian sausage links, I cut mine into 1/4's as they were large
3 pints cherry tomatoes
1 medium onion, cut into 1 1/2" chunks
4 large cloves garlic, sliced
3 tbs extra-virgin olive oil
1 1/2 tbs balsamic vinegar
2 tsp dried thyme
3 bay leaves
salt and freshly ground black pepper
3 cans (around 16 oz) white beans, undrained I used Great Northern and Cannellini

Serves 8

Adjust oven rack to lowest position and heat oven to 425 degrees.

Mix sausages, tomatoes, onion, garlic, olive oil, vinegar, thyme, bay leaves and a generous sprinkling of salt and pepper in a large heavy roasting pan. Set pan in oven and roast until sausages are brown and tomatoes have reduced to a thick sauce, about 45 minutes. Remove from oven, stir in beans, and continue to roast until casserole has heated through, about 10 minutes longer. Fish out bay leaves and serve.

Sunday, September 26, 2010

Nutella Tart


I hate to bake, but every year I am tasked with making my wife a birthday cake. This often becomes the cake for my son's and my birthday as well. My son was born on my wife's birthday and my birthday is 8 days later. Now this year my wife and I turn the big 50, so I thought the cake should be special. Here is what I came up with.

Nutella Tart
1 1/2 cup Graham Crackers, crushed or you can but them
1 stick unsalted butter, melted
9 oz dark chocolate chips
3/4 cup Nutella
1/2 cup Half n Half or heavy whipping cream
1/2 to 1 cup of chopped nuts, depending on how nutty you want it.

Preheat the oven to 350 degrees.
Mix the crushed graham crackers with the butter. Spread the graham cracker mixture evenly over the bottom of a spring form pan. Bake for 10 minutes. Remove from the oven and let the crust cool.
While the crust is cooling melt chocolate chips with a couple of ounces of the half n half. After the chips are melted mix in the Nutella. Then mix in the rest of the cream. The results should be a thick but easily spreadable. When the crust is cool add the filling and sprinkle the nuts on top. Put in freezer for about 20 minutes. The purpose of putting the tart in the freezer is to set the chocolate not freeze the tart. After you remove the tart from freezer move it to the refrigerator until about 30 minutes before you are ready to serve. Then let the tart set at room temperature so it is easy to cut.

Monday, September 20, 2010

Steak Florentine


At my house it is my wife who is the meat and potatoes person. Very seldom do I get the craving for a slab of beef. This weekend she had the hankering for a hunk of red meat. Having been married to her my entire life, I knew resistance was futile. So I fired up the grill and pulled out the rib eyes. Of course I let the Italian influence in me take over.

Steak Florentine
1 clove garlic, large, peeled and slightly crushed
1 steak, 1 to 1 1/2 pounds I used a ribeye
salt and pepper to taste
juice from 1/2 lemon
1 tsp olive oil

Preheat grill to medium heat.
Rub both sides of the steak with the garlic clove. Make sure you rub the bone with the garlic as this will get more of the garlic essence out of the garlic. Grill the steak to desired doneness, about 4 to 5 minutes per side for for rare, 6 to 7 minutes per side for medium rare. The doneness will vary by type and size of steak. After the steaks are done. Squeeze the lemon over the steak and drizzle with olive oil. Let the steak rest for about 5 minutes, then enjoy.

Monday, September 13, 2010

Sweet Corn and Zucchini Gratin with Fresh Basil


The other day I was sitting in my chair surfing cooking websites trying to find something for dinner. I asked my wife if she was in the mood for anything in particular and she replied we need to get rid of this zucchini and sweet corn. As I started searching for zucchini and corn recipes, I reminded her why we had so many zucchini. She had decided to make zucchini bread and asked me to get extra. Suddenly it hit me, not an idea for dinner a flying zucchini. When I came to the following recipe was on my screen, well at least a variation of it. This recipe is based on a recipe by chef Guillame Bienaime at Restaurant Marche in Menlo Park, CA, even though he calls it a gratin it reminded me of a frittata, it seemed to eggy for a gratin. It was still very good. By the way no bloggers were actually hurt in the making of this post. My wife has never thrown a zucchini at me, it wouldn't hurt enough if she connected.

Sweet Corn and Zucchini Gratin with Fresh Basil
1 tbs Extra Virgin Olive Oil
1 small onion, finely chopped
1/2 pt Cherry Tomatoes, cut in 1/2
1 garlic clove, minced
3/4 lb zucchini and/or yellow squash, thinly sliced or small diced
3 Ears Sweet Corn, kernels removed and separated
2 large eggs
1/2 cup milk
1 large handful of Fresh Basil, coarsely chopped
1 small handful of Fresh Parsley, coarsely chopped
3/4 cup Sharp Cheddar, shredded
Sea Salt and Fresh Ground Pepper to taste

Preheat oven to 375 degrees.
Oil a 2 qt baking dish. Heat olive oil in a large skillet over medium heat and add the onion. Cook until soft, about 3 minutes then add the garlic, zucchini and or squash and salt and pepper. Cook stirring often until zucchini is bright green and some of the slices are translucent.
Stir in the kernels of corn from 1 ear of corn. Heat for 2 minutes and then remove from heat. Pour mixture into a large bowl. Place the rest of the corn in a blender. Add eggs, milk and 1/2 tsp of salt, blend until smooth. Pour the egg mixture over the veggies in the bowl. Add the basil, parsley and cheese. Mix together and pour into the baking dish. Bake 35 to 40 minutes, until the top is browned and the gratin is firm to the touch.

Sunday, September 12, 2010

Manchego and Asparagus Stuffed Chicken Breast


Did you ever have a craving for some food or type of food so you plan the whole meal around that item? This weekend my craving was for southwestern food. I found a recipe and thought I could add some southwestern seasoning to that and it would be really good. Since it was a new dish I followed the recipe closely, a little to closely. After I was done and had the dish in the oven I turned around and saw my southwestern seasoning sitting on the cupboard behind me and realized I never added it to the dish. Now to come up with another recipe for the chicken. Well here is the recipe I came up with.
Note I used Manchego cheese in this recipe if you can't find it you could use parmesan. Manchego is available in grocery stores around here so I assume it is readily available elsewhere. If you have not heard of Manchego it is a semi-hard cheese, that comes from the La Mancha area of Spain. It is made from the milk of the Manchega sheep. The cheese is rich with a buttery and slightly spicy flavor. Manchego quickly became a family favorite when we tried it a couple of months ago. I think it is worth looking for if you haven't tried it before.

Manchego & Asparagus Stuffed Chicken Breast

This recipe is for 1 breast, just multiply by the number of breasts you need. You won't have to double the olive oil just use enough so the breasts are sitting in the oil.
2 tsp olive oil
1 chicken breast butterflied, cut in half so that it opens like a book
dijon mustard, enough to coat the inside of the chicken book
3 thin asparagus stalks, hard ends removed
1 thin slice manchego cheese, about as long as the breast
1 thinly sliced piece of ham

Heat the olive oil in a pan over medium high heat. While the oil is heating spread the chicken breast out like a book and cover the inside with dijon mustard. Lay the 3 stalks of asparagus on the bottom half of the breast, then the cheese and the ham. Fold the top slice of the chicken breast over the stuffing. It should now look like a regular chicken breast with stuffing.

Place the breast in the pan carefully, so it does not fall apart. cook until bottom is golden brown. Flip the breast over and cook the other side until browned.

Saturday, August 28, 2010

Cuban Sandwich


It seems like everywhere I look lately they have Cuban sandwiches. Being the foodie that I am I had to investigate. Wikipedia says a Cuban sandwich consists of yellow mustard, thinly sliced pickles, pork and slices of glazed ham. I had some left over pork loin roast that I had grilled. The roast had a spicy/sweet rub on it that I had made. That seems easy enough, so here was my version. Not bad for someone who never had one before.

Cuban Sandwich
2 slices of good quality bread
2 slices of ham, I used honey ham from the deli
2-4 slices pork roast, depending on size and thickness of roast
enough slices of dill pickle to cover the sandwich
enough yellow mustard to cover 2 pieces of bread
Olive Oil to spread on the side of the bread without the mustard

On one side of the bread spread olive oil on the other spread mustard. On the mustard side put down the pork, then the pickles, then the ham. Put the other slice of bread on top with olive oil side on the outside. If you have a panini press/George Foreman grill use that, if not then use a griddle/frying pan with a weight on top of the sandwich (I used a griddle with a cast iron skillet on this sandwich). Cook until bread is golden brown and turn over and do the other side if using a frying pan/griddle.

Sunday, August 1, 2010

Seared Salmon With White Beans & Spinach Topped With Olive-Lemon Relish


Last week I received 4 cookbooks in the mail and then went away for the weekend. So this weekend I had to put the first one to the test. This week's book is Stir Mixing It Up In the Italian Tradition by Barbra Lynch. Since Annette wanted salmon for dinner I had to select from 3 recipes. Two of the three recipes called for ingredients that I did not have on hand. I had to make a few changes to put my own spin on this recipe because I thought it was kind of bland and there was a lot of fat where none was needed. Also Annette is not a big olive fan so I adjusted the Olive-Lemon Relish so the olives flavor wasn't so strong.

Seared Salmon With White Beans & Spinach Topped With Olive-Lemon Salad

White Bean and Spinach
1/4 cup chicken/vegetable broth (the original recipe called for 1/4 cup olive oil)
8 oz fresh spinach, tough stems removed cleaned and dried (I used frozen)
1 15 oz can white beans, rinsed and drained
1 clove of garlic, thinly sliced
1/8 tsp crushed red pepper, add more if you like heat

Salmon
2 tbs olive oil or Canola oil

Olive-Lemon Relish
1/4 cup Picholine olives, pitted and chopped (I only had Kalamata so I used those)
1/2 Lemon juiced, cut the other 1/2 into segments and finely dice
1/2 Lemon peeled and pith removed fruit cut into small pieces the size of the olive pieces
1 tbs parsley, finely chopped, original called for 2 tbs
1 small shallot, finely chopped
1 tsp honey, more if needed original called for 1/2 tsp
splash of white wine vinegar, original called for 1/2 tsp
1/4 tsp kosher salt, I left this out brined olives took care of the salt
fresh ground pepper to taste

White Bean & Spinach
In a frying pan, over medium heat, add 1/2 the broth, the pepper and the garlic, bring to a simmer. Toss in the spinach and cook until it cooks down (if all of the spinach doesn't fit cook 1/2 then add the rest once the first batch cooks down). After the spinach is cooked down add the beans and the rest of the broth. Cook until the beans are heated though. This will be the the base the salmon sits on.

Salmon
In a frying pan , over medium high heat, add the oil. When the oil is hot add the salmon and cook until the salmon is golden, then flip over and cook until the second side takes on some color. Sit on the spinach and beans.

Olive-Lemon Relish
Mix all of the ingredients together in a bowl. Taste and add pepper, honey, vinegar or whatever is needed to make this taste how you like it. Spoon over the top of the salmon.

Thursday, July 15, 2010

Electrolux #splits: Lemon Sorbet


When Foodbuzz offered to donate $50 to Ovarian Cancer Research Fund (OCRF) for every Foodbuzz featured blogger who posted a banana split recipe, I had to do it. The problem is I mainly post healthy recipes. I decided to post my version of ice cream and do a sorbet. Foodbuzz picks the Top 9 recipes each day and on Monday the entire top 9 will be "banana split recipes" in order to show support for OCRF. You can help to by going to http://www.kelly-confidential.com/foodbuzz and build a virtual banana split. So as soon as you are done reading this click on the link and go help the cause.

Lemon Sorbet

2 cups sugar
2 cups water
1 1/2 cups freshly squeezed lemon juice
1 tbs lemon zest finely chopped
Sprig of mint for each serving

Combine sugar & water in a medium saucepan and bring to a boil over medium high heat. Once it starts to boil, reduce to low and simmer until sugar dissolves. Cool completely. I usually put it in the freezer to cool quicker. When completely cool add lemon juice & zest. If you have an electric ice cream maker, turn the machine on, pour lemon mixture into the freezer bowl and mix until thickened. If not, pour into a freezer-safe bowl and freeze until thickened.

To serve put in bowl and garnish with mint sprig and/or lemon slices. Or you could add fresh berries. If you wanted to serve to adults but a scoop in a glass and fill with prosecco. This recipe is based on one that came with my Cuisinart Ice Cream maker.

Saturday, June 26, 2010

Roll with it...


After 6 weeks I finally have my camera back, so now I can post recipes again. It was a strange making food, plating it and eating it while it was still hot. You guys missed a bunch of delicious recipes I made with pesto like shrimp pasta, Caprese salad and an awesome vegetable soup with eggplant. Maybe I'll make another batch of pesto and take pictures this time. I did sneak a little pesto into todays recipe so you wouldn't miss out completely. I was thinking of turning my culinary adventures to tomatoes as we seem to be heading for a bumper crop. I already picked about a pint and a half of cherry tomatoes and we had 2 Romas ready but something got to them before I did.

I wanted to do something fun today so I made a savory pinwheel, Prosciutto and Mozzarella. They are based on a recipe by Giada de Laurentiis, but I had to make my modifications. I thought her recipe seemed a little lack luster and dry so here is my version of Giada's

Prosciutto and Mozzarella Pinwheels

1 pound pizza dough
2 cups shredded mozzarella cheese
7 ounces Prosciutto
1 cup spinach coarsely chopped
1 tbs pesto
1 tbs olive oil
Kosher Salt and freshly ground Pepper to taste
Marinara for dipping

Preheat oven to 425˚ degrees fahrenheit.
Roll the pizza dough out to a 12 to 14 inch rectangle about 1/4 inch thick (a circle will work but dough won't be as even when cutting.
Sprinkle 1 cup of mozzarella on the dough. leaving a little space on all 4 sides. Dot the cheese with the pesto, more is not better you don't want it to get runny or to moisten the dough. Then cover with the prosciutto. Now sprinkle chopped spinach. Finally spread the rest of the mozzarella on the spinach.
Roll the dough into a cylinder and tuck the ends under to prevent leaking. Place on a foil lined cookie sheet that has been sprayed with no stick spray seam side down, if you have parchment or a Silpat these will work as well. Lightly cover the roll with olive oil, then sprinkle with salt and pepper. Bake until the top is golden brown, about 25 minutes.
Let it cool for 5 minutes then cut in 3/4 inch segments. Cutting will be easier if you use a serrated knife. I served with marinara sauce for dipping. Good enough for adults but kids love the dipping bread or "Pizza Pinwheels".

Saturday, May 29, 2010

Memorial Day


As the long holiday weekend kicks off, I wanted to take the time to reflect on Memorial Day. Most of the readers of this blog are probably aware that Memorial Day was created to honor the men and women who have served in the US military. I seriously doubt that anyone high school age and under knows that, to them Memorial Day is just another day off from school. I don't blame them, I blame their parents. People like me who never took the time to tell their kids what Memorial Day is about. Sometimes a parent can learn from their child as my wife and I did.

My son, Joel, was one of those kids that was never inspired to do well in school, because he did not like it. He did well when he was tested on end of year tests and on the SAT, so he had the brains just not the motivation. His best friend Saul, had decided at an early age to go into the military as soon as he turned 18. After 9/11 Saul started badgering Joel to join the military with him. Joel never mentioned anything to his mom and I until his senior year in high school 2 years later. After many hours of heated debate, we reluctantly decided to sign the papers to let him enlist. (Joel was only 17 when he graduated so we had to sign before he could join.) To make a long story short he left the Marines after 4 years as a Sargent. He had received 3 Purple Hearts and numerous other medals and accolades. While we had several terrifying moments receiving a phone call from the US Government telling us he had been injured, thankfully none were serious. After 4 years he came home with all of his limbs and with a new out look on life.

For most kids that would have been the end of the story, but once again Joel decided to surprise us. One of the things he got out of the Marines was discipline, after hanging around for a year after getting out of the Marines he decided to go to college. While attending college he decided that he wanted to become a pilot. After looking at all of his options he joined the ROTC for the Air Force deciding it was the best and cheapest way to learn to fly. Joel is once again excelling at his duties and has been given several scholarships by the ROTC to get through school. Right now he is in Alabama attending an officer training school. Making his parents proud once again.

This Memorial Day as I think about the veterans I have known over the years, the one that makes me the proudest is the kid that used to blow of his homework and play video games, the one that argued with me about taking the garbage out or walking the dog. So mom and dads remember they may not always listen to you or agree with you, but they can still turn out to be kids that you will be proud to say are yours.

Love you Joel keep being you and you will go far. And happy Memorial Day!


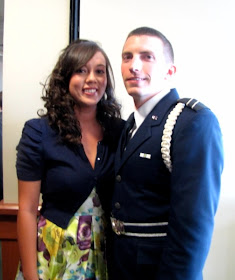
Joel and his girlfriend Meghan McCloskey.

PS For those of you wondering I have not been posting lately because my camera died in a big way. The local camera repair shop could not fix it and they have sent it to the manufacturer to see if it can be repaired. I should know the verdict on Tuesday. Hopefully, within a week after that I will have it back or I will will have a new one.

PSS Just so no one can say I ignored food in this food blog. Here is a link to my favorite side dishes that would be perfect for a Memorial Day picnic. Baked Potato Salad and Barbecued Baked Beans.

Monday, May 10, 2010

Baked Potato Salad


With warm weather and picnic season upon us it is time for my favorite potato salad recipe. This is different than other potato salads because the potatoes are baked and the ingredients are typical baked potato toppings. Things like chives, bacon, sour cream and cheddar cheese. This is another recipe where I measure with my eyes and not with cups and tablespoons, so taste and adjust as you see fit. Most of the time I use low fat mayo, sour cream and cheese for this and garnish with real cheese. If you like a creamy potato salad let the potatoes cool before adding the mayo sour cream mixture. If you add the mayo sour cream mixture while the potatoes are hot they will absorb more of the mixture making a dryer version.

Baked Potato Salad
2-3 lbs cooked potatoes, cut into bite size pieces I usually use Yukon Gold, but used Red Bliss in the batch pictured
1/2 cup sour cream, I use low fat
1 tbs mayo, I use low fat
4 strips bacon, cooked until crisp and crumbled into small pieces. Reserve 1 tbs for garnish. I usually use center cut bacon
1/4 cup chives or green onions, cut into small rings, reserve 2-3 tsp for garnish
1/3 cup shredded cheddar cheese, reserve 1 tbs for garnish

Add all of the ingredients to a bowl and fold together until everything is coated with the sour cream mayo mixture. After it is all mixed together top with the reserved garnishes.

Thursday, May 6, 2010

Tilapia Topped with Shrimp, Asparagus and Spinach


Have you ever seen a recipe and just knew you could do it better? A while back I saw a recipe where the person fried fish, shrimp and asparagus and then stacked them on top of each other. This weekend I decided to see what I could do to improve this dish and here is my results.

Tilapia Topped with Shrimp, Asparagus and Spinach

2 tilapia fillets
12 shrimp, peeled and deveined
1/4 cup baby spinach leaves
4 to 6 asparagus spears, cut into 2 inch pieces
2 tsp butter, cut into 4 pieces
1 lemon, juice and zest
2 tsp parsley finely chopped
Non Stick Spray
1 cup cooked brown rice

Preheat oven to 350 degrees.
Spray 2 individual baking dishes with non-stick spray. Place 1 tilapia fillet in each dish. Top fillet with 1/2 of the spinach, then place the 1/2 the asparagus on top of that. Top the whole thing with the 1/2 the shrimp. Then sprinkle with 1/2 the lemon juice and dot with the butter. Bake for about 20 minutes, until shrimp and fish are done.

Remove from oven then remove fish from dish. Add rice to the dish and mix with the butter and lemon left in the dish. Place the fish on top of the rice and garnish with the parsley and zest.

Tuesday, April 27, 2010

If Ronald McDonald was Italian...


I mentioned a couple of weeks ago that my brother came to town and I made polenta cakes. Well I had to come up with some ideas for what to do with the leftovers. You have already seen Grilled Polenta Cakes with Bruschetta Topping here is what I did with the last couple of polenta cakes. Egg McMuffins Italian style.

Egg McPolenta
1 fried egg
1 slice fresh mozzarella
1 slice of tomato, 2 if you are using Roma tomatoes
1 slice prosciutto
1 polenta cake, I cut the cake in half so I had a top and bottom "bun" but only ended up eating 1 of the pieces
1 tsp olive oil

This recipe is for one serving just multiply it by the number of people you are serving.

Heat the olive oil in a nonstick frying pan, over medium heat. Add the polenta cake pieces and heat through. Remove and set aside while you fry the egg. To keep the egg the shape of the polenta I cracked it into a round cookie cutter a little smaller than then polenta cake. Spray the cookie cutter with non-stick spray for easy removal. After egg is fried place prosciutto on polenta then mozzarella, tomato and egg.


Saturday, April 24, 2010

Grilled Asian Seafood


Grilled Asian Seafood
12 shrimp, peeled and deveined
8 scallops
juice of 2 limes
1 tbs sesame oil
2 tsp sesame seeds

Put the seafood, lime juice and sesame oil in a resealable bag and set it aside for 15 minutes but not longer than 30 minutes. Toss them on the grill and cook until done, about 4 to 5 minutes. I like to put small things on 2 skewers to make them easy to turn. Sprinkle with the sesame seeds and plate.

Wednesday, April 14, 2010

Grilled Polenta Cakes with Bruschetta Topping


My brother, Bob, came to visit me this past weekend. He wanted me to recreate the dinner that I blogged about when I went to Paula's from Bell' Alimento for a cooking lesson. Now what do you do with leftover polenta cakes? I narrowed my options down to grilling them or putting frosting on them setting them on a paper plate and leaving them in the break room at work. The second would have been funnier but I am glad I went with the first. I think my co-workers are glad I opted for the first option as well.

Grilled Polenta Cakes with Bruschetta Topping

Tomato Topping
2 tomatoes, cut into a small dice
2 tbs Kalamata olives, sliced
1 clove garlic, minced
4 basil leaves, cut into fine ribbons
Olive oil to cover the mixture

Polenta Cakes
Preheat the grill to medium high.
Make a batch of Paula's Polenta Cakes right up to the point where you you get the saute pan.
Take the polenta cakes and put them on a well oiled grill, to prevent them from sticking. Cook until polenta has good grill marks and then flip and repeat.
Top each polenta cake with the tomato mixture.

Sunday, April 11, 2010

Grilled Chicken Caprese


I have a new food obsession. My brother wanted my old treadmill and wanted to know what I would charge him for it. I think my answer surprised him, dried Michigan cherries. I became addicted to these while in MI in January. I now have 20 pounds of dried cherries, anybody got any good dried cherry recipes?

While my brother was here I took him to an Italian restaurant food supplier that is open to the public. Of course I had to stock up on a few things including fresh mozzarella. Here is one of the recipes I came up with.

Grilled Chicken Caprese
This recipe is per person as it is easy to double, triple, quadruple, etc.
1 chicken breast, cut 3/4 of the way through, so it opens like a book
1 slice fresh mozzarella. you may have to cut in half and place end to end if you have a narrow chicken breast
1 slice of tomato, you may have to cut in half and place end to end if you have a narrow chicken breast
Basil leaves to lay on top of mozzarella
Olive oil to drizzle on breast
Salt and pepper

Preheat grill to medium high.

Drizzle olive oil on the breasts and sprinkle with salt and pepper. On one side of the cut breast put the mozzarella piece(s), tomato piece(s) and basil. Preheat grill to medium high.

Drizzle olive oil on the breasts and sprinkle with salt and pepper. On one side of the cut breast put the mozzarella piece(s), tomato piece(s) and basil. Fold other half of breast over the side with ingredients. Grill until meat is cooked to the desired doneness. Enjoy!

The next post will be the polenta cake in the picture next to the Grilled Caprese Chicken.

Thursday, April 8, 2010

Berry Tart My Easter Dessert


This year Easter was going to be a little strange for my wife and I. None of our 3 children would be home for Easter, our first childless holiday in 26 years. But then out of the blue we get an email from my best friend from college. She is bringing her husband, 2 children and one of their friends to Durham to check out colleges and they wanted to get together for dinner. So I got to make a big Easter dinner after all. Our dessert was this berry tart. I made it several years ago and it was very good. The recipe os from Perfect Light Desserts by Nick Malgieri, yes he wrote a healthy cookbook.

Berry Tart

Sweet Pastry Crust

1 cup all-purpose flour
3 tbs sugar
1/2 tsp baking powder
1/4 tsp salt
3 tbs unsalted butter, cold and cut into 6 pieces
1 large egg
1 tbs cold water

Combine the dry ingredients in a food processor. Pulse to mix ingredients.

Add butter and pulse 12 times.

Add the egg and water and pulse until dough forms a ball.

Pour dough onto a floured surface.

Form the dough into a disk. Then wrap it in plastic.

Refrigerate for 3 hours to 3 days. You can use immediately but dough will be a little soft.

Preheat oven to 350 degrees.

Before you use the dough unwrap it and gently knead it on a floured surface. Then form it into a disk again and roll it out into a 11 to 12 inch disk. Transfer to a 8 or 9 inch fluted tart pan. Press on bottom and sides and cut off any excess dough.

Poke holes in bottom of tart with a fork, about every 1/2 inch. Place tart on center rack and bake for 15 minutes, or until it just starts to turn golden brown. Do not over bake or crust becomes very hard.

Cool tart on a rack.

Pastry Cream Filling

1 cup fat-free milk, I usually use 1%
1/4 cup sugar
3 tbs all-purpose flour
1 tsp vanilla extract
2 tbs unsalted butter, softened

Combine the milk and 1/2 of the sugar in a small nonreactive saucepan. Bring to boil over low heat. Combine rest of sugar and the flour in a small mixing bowl and whisk together to mix. Whisk in the eggs, one at a time. When the milk boils whisk in 1/3 of the egg mixture. Return the rest of the mixture to a boil. Whisking constantly add the rest of the egg mixture in a slow steady stream. Keep whisking until the pastry cream thickens and comes to a boil with large bubbles bursting at the surface. Whisk for 20 seconds longer and remove from heat. Add the vanilla and the butter. Pour the filling into a glass bowl and cover with plastic wrap touching the surface of the cream so a film does not form. Refrigerate until you are ready to assemble the tart.

Finishing the Tart

3 1/2-pints of raspberries or a mixture of raspberries, blueberries and strawberries
2 tbs powdered sugar

Pour the cream in the tart shell and spread evenly. Arrange the berries on top. Sprinkle with powdered sugar.

Sunday, April 4, 2010

Berry Tart


This recipe coming later this week